


|
Curtis Curtis Color Scout |
Manufactured or assembled in USA from (Before) 1939 to (After) 1939.
Index of rarity in France: Rare (among non-specialized garage sales)
Inventory number: 30065
See the complete technical specifications
Chronology of cameras Curtis
Traduction de Manuel M
The Curtis starts again the principle of three colours process already used by the Jos-Pe, as of the Twenties, in Germany.
This kind of camera remains very rare. It allows the separation of the colours.
There is only one lens, but the luminous ray will have a very particular development. It will go through two semi-transparent mirrors. On the first mirror, a part of the ray will light by reflection a sensible surface after go through a coloured filter (red, blue or green/). The coloured filter will let pass only the colour corresponding to him.
The luminous ray carries on its way while go through the first semi-transparent mirror. It arrives on a second mirror (still semi-transparent). As with the first mirror, a part of the ray, by reflection, then go through of a coloured filter (of a different colour from the first time) light a sensible surface.
The part of the ray which go through this second mirror, go through a filter (of a third colour) and expose the third sensible surface. Because of the reversal of the ray in the mirrors, the third image will symmetrically be reversed in the vertical compared to the two first.
Three significant surfaces are an emulsion black and white, they thus have grey different according to the coloured filter crossed by the luminous ray.
Once the three surfaces exposed, it remained to make the colour printing starting from the levels of grey. This one was long, expensive and certainly not accessible to an amateur. Various processes allowed the reconstitution of the colours. At Curtis, it was called the Orthotone.
As I do not find anything on Orthotone, I reproduce below an article extracted from Popular Photography of December 1938, presenting the principle of the Chromatone, process close to the Orthotone, at Defender.

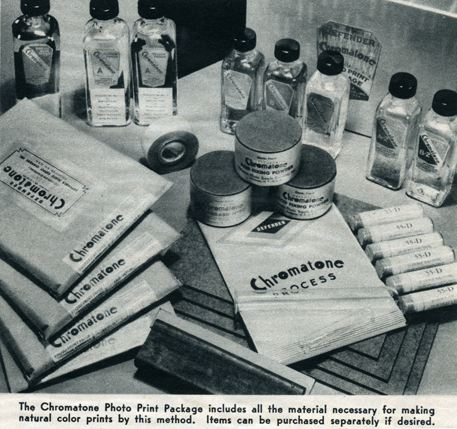
Chromatone for color prints
 by A. H. LIVINGSTON
Defender Photo Supply Co.
Here’s a simple method of making color prints. Transparent positives from the separattion negatives are toned and assembled in register on a mount.
A PHOTOGRAPH in natural color stil brings forth “ohs” and “ahs” when displayed, but no longer as a novelty creation. The beautiful print in the full colors of nature is a lasting tribute to the ever increasing perfection of photographic technique and to the ceaseless efforts of manufacturers to produce processes which will permit the photographer to portray his subjects as they actually appear.
Chromatone, a simple modern color print process, was introduced in 1935. Francis H. Snyder and Henry W. Rimbach, research scientists, sought as chemists and not as photographers, a method by which they could reproduce color in photomicrographic work. The toning methods and the formulas which these two men devised and the stripping film and its emulsion, developed by the Defender Photo Supply Company, combined to produce the Chromatone Process of today.
This color method has been accepted by many eminent photographers who are continually supplying national advertisers with the fascinating color illustrations which are currently appearing in popular magazines and other publications. The process, however, is not restricted solely to the commercial and professional fields, and should hold no terror for the amateur enthusiast. It is simple in technique and manipulation; excellent in results. It involves no generally new methods of processing. All of the treatments and manipulations involved are of a nature similar to those with which he h already familiar, namely, developing and toning. The Defender Chromatone Process is based on the principles which are fundamental to “two-color” and “three-color” photography.
No effort will be made in this article to discuss the scientifle aspects of color photography, but merely an attempt to explain the process sufficiently so that the reader, even if he has no knowledge of “three-color” theory, will be able to approach the making of color prints with a more complete understanding of the procedure.
It is no longer unusual for the amateur, to say nothing of the professional, to make three-color separation negatives with his regular camera and to produce from these a pleasing natural color photograph. The mysterious haze which heretofore has shrouded the making of separation negatives has been cleared through the publication of many articles and books on the subject. The booklet, “Methods of Making ThreeColor Separation Negatives,” published by the Defender Company is an excellent exposition of the many phases of preparing color-separation negatives.
Outine of Chrometone Process
All color processes depend upon and start with the three-color separation negatives. Starting with the three negatives taken respectively through blue, green, and red filters a balanced black-and-white positive is made from each on a special collodion stripping film (Chromatone Photo Print Paper) of a total thickness, when dry, of about onethousandth of an inch. These positive images are then toned in the special toners to yellow, magenta (blue-red), and blue-green. The three toned and stripped films are superimposed upon one another on a white paper base and allowed to dry. The result is a print in full natural color. It can be made without undue haste in one hour.
The finished Chromatone print, therefore, consists of three superimposed collodion-gelatin layers, toned respectively yellow, magenta, and blue-green. The print presents as its surface a durable collodion film which can easily be kept clean by wiping with a wet sponge if the print is not to be protected by glass.
Making fhe Black-and-Whife Positives
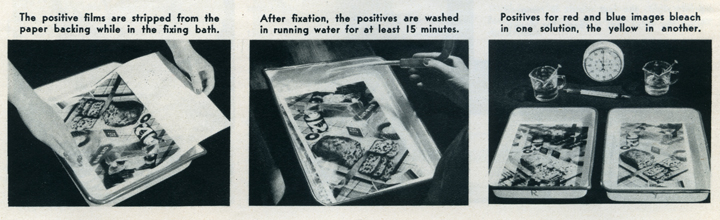
The first step in making prints by the Chromatone Process is the preparation of black-and-white images on Chromatone Print Paper from the three-color separation negatives. The color balance of the final print will depend upon the care employed in making the original black-and-white positives. The three prints, one from each negative, should be developed simultaneously in a deep dish with plenty of developer. Fixing is accomplished in the usual manner and it is in the fixing bath that the films can be stripped from the backing paper.
Following the foregoing procedure it has been found that this process has not been far out of the ordinary routine for black-and-white photography. The toning which follows is merely a mechanical operation and is the only deviation from the system to which all experienced workers are accustomed.
The second step and all the ensuing phases in the making of the Chromatone print may be carried on in white light. In fact, as soon as the black-and-white prints are fully fixed, white light may be admitted.
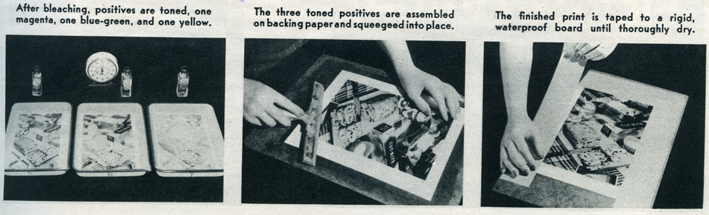
The stripped off black-and-white positive prints, intended for the red and blue images are placed in a tray and bleached in Red Toner A. After washing, the red image is placed in red Toner B and similarly, the blue image is placed in Blue Toner B. The yellow image is bleached and toned in the same manner using Yellow Toner A and Yellow Poner B. When the images are immersed in the different toning solution, the colors appear like magic.
The third step is the assembly of the toned positives to make the finished print.
 The registration of the three images in the final assembly is generally assumed to be difficult, but in reality it is accomplished very easily. When still wet, the images may be moved about at will and if they are not perfectly registered at first, it is possible to remove them, rewet them, and reassemble. This, of course, applies to the images before they have been squeegeed firmly into place and dried to any extent.
 The three images toned their respective colors are now registered on a gelatin-coated paper (Chromatone Backing Paper). The yellow image is placed on the wet paper and squeegeed into place. The magenta image, after a few minutes’ lapse, is placed on top of the yellow fixage, carefully registered and squeegeed firmly into position. A piece of blue cellophane placed over the light source at this stage aids greatly in effecting registration as the lines of the yellow image are very prominent when viewed in a blue light and it is a simple task to get perfect registration of the yellow and magenta positives.
After the yellow and magenta prints have been registered, the blue one, superimposed upon the other two, completes the assembly. The result, a print in full colors effectively reproducing the original subject, is positively startling when accomplished the first time. It is nearly as thrilling in each subsequent experience.
If the entire assembly is made with the collodion side up, the surface of the print has a high gloss. When assembled with the emulsion side up, Chromatone prints dry with a luster surface which is of higher gloss in the highlights than in the shadows. Variety may be given to the surface in many different ways. Pressing a piece of cloth (organdie) on the collodion surface while it is still wet will leave an imprint of the texture of the cloth and give a pleasing effect. It is also possible to assemble the print on fixed-out rough surfaced papers in place of the special backing paper. Other novel effects may be achieved through the rubbing of the surface with pumice stone or spraying with matte lacquer.
The cost of making a completed 5 x 7 Chromatone print amounts to approximately 74 cents but may be reduced considerably if the enthusiast uses a rubberset brush for brush-toning the prints rather than immersing them in a larger quantity of solution. Make sure, however, that the brush has no metal parts which are likely to mar the print.
The Defender Chromatone Process is not an involved and intricate system for producing a photograph in natural colors. Quite the contrary is true. Anyone who is painstaking and exercises precision in his work can turn out successful Chromatone photographs.
Interesting links or bibliography :
| Principe de séparation des couleurs, suggested by Sylvain Halgand |
| Scott's Photographica collection, suggested by Sylvain Halgand |
Add a link or element of bibliography, a picture taken with this camera, a picture of box or an ads about this camera
Your photos taken with the same camera:
Cameras from Ebay France (Curtis) (Uploaded each 3 hours)